 Blog
Design Primer for PCR: Rules, Steps and Checks
The usual advice for designing PCR primers starts with length and GC content. That's useful, but it isn't enough: a primer pair can satisfy both rules and still amplify a paralog, miss a strain, or produce misleading qPCR fluorescence. A reliable design starts with the biological target, uses numerical filters to shortlist candidates, and finishes with specificity screening and validation on the intended template.
By Multimod Labs.
Table of Contents
- Starting Values for Length, Tm and GC
- How to Design a Primer Pair Step by Step
- Specificity Checks With BLAST and Target Variation
- Worked Example With One Primer Pair
- Annealing Temperature and Symptom-Driven Troubleshooting
- Record Your Primer Checks and Tools
Starting Values for Length, Tm and GC
For conventional PCR, sensible starting targets are primers of 18–22 nucleotides, melting temperatures of 55–65°C, 40–60% GC, and forward and reverse Tm values within approximately 2–4°C, following the MIT primer-design guidance. These specifications narrow the search, but they don't establish that an assay will work.
Melting temperature, or Tm, describes duplex stability under specified conditions. It isn't the same as the annealing temperature programmed into a thermocycler. Both primers must function during the same annealing step, so a well-matched pair is more useful than a pair whose individual values merely fall inside an acceptable range.
Starting primer targets by PCR type
| Parameter | Conventional PCR | qPCR |
|---|---|---|
| Primer length | 18–22 nt, with a broader design range of 18–30 nt | 20–24 nt |
| Melting temperature (Tm) | 55–65°C | About 59 ± 2°C |
| Forward and reverse Tm difference | Within 2–4°C | Closely matched within the 59 ± 2°C window |
| GC content | 40–60% | 40–60% |
| Secondary structure and dimers | Avoid significant structure | Avoid significant structure and self- or cross-complementarity |
| Annealing temperature | Initial estimate about 5°C below the lower primer Tm | Initial estimate about 5°C below the lower primer Tm, subject to chemistry-specific guidance |
Short primers can match more locations than intended. Adding bases may improve discrimination, but excessive length can also increase Tm and create opportunities for secondary structure. Length therefore needs to be evaluated alongside sequence composition, not optimized independently.
For qPCR, the consequences extend beyond whether a band appears. With intercalating-dye detection, unintended double-stranded products can contribute fluorescence; probe-based detection adds another specificity requirement rather than making primer quality irrelevant.
Practical rule: Numerical targets are filters for candidate selection, not evidence of analytical performance.
A slightly unconventional candidate may deserve testing when it occupies a conserved, unique region. A candidate with ideal composition deserves rejection when its binding sites don't match the biological question. The useful output of initial filtering is a shortlist, not a declaration that the assay is validated.
How to Design a Primer Pair Step by Step
Primer design works best when sequence selection, reaction conditions, and experimental purpose are considered together. For qPCR, Merck's assay-design guidance gives typical primers of 20–24 nucleotides, approximately 59 ± 2°C Tm, and 40–60% GC, alongside screening for secondary structure and complementary regions.
The workflow begins with the sequence and ends with candidates ready for specificity assessment.
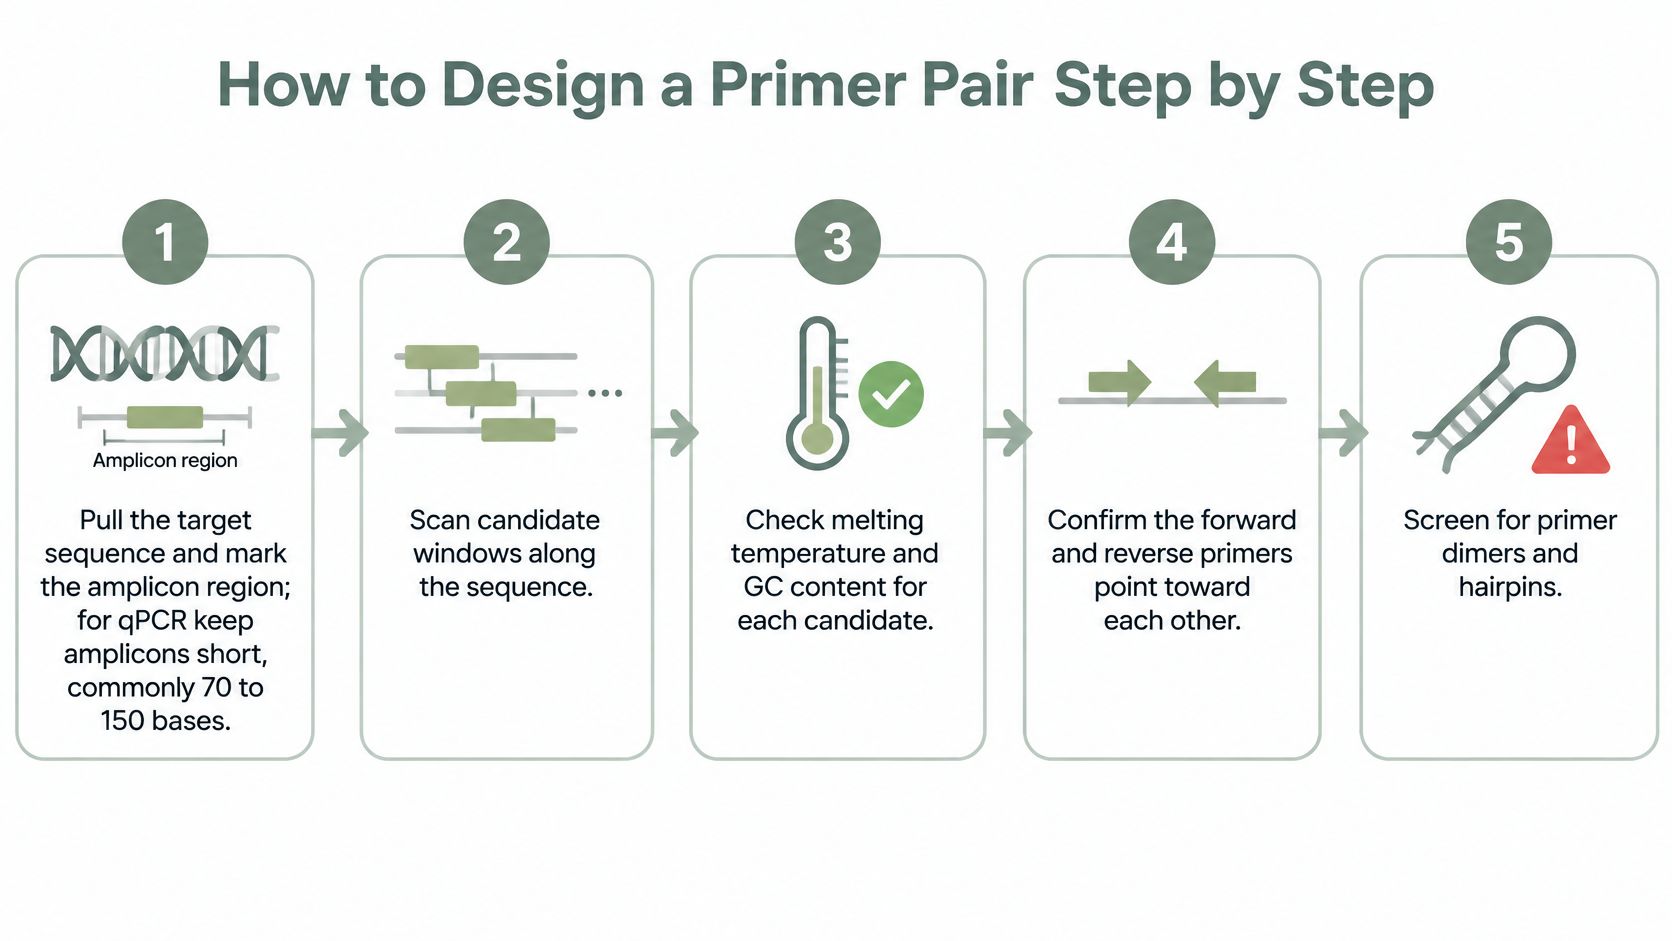
From target sequence to candidate pairs
Define the intended measurement. Retrieve the reference sequence, accession, and version for the genome or transcript of interest, then mark the proposed amplicon. A gene-level expression assay and an isoform-specific assay require different decisions about acceptable binding sites.
Choose candidate windows. Primer3 can generate candidates within the desired region rather than forcing a convenient sequence into service. Windows containing long homopolymers, repetitive sequence, or strongly uneven base composition deserve particular scrutiny because they can complicate binding and specificity.
Inspect the extension ends. The primer's 3′ end must support extension at the intended site, so its sequence deserves separate inspection rather than disappearing into an overall GC percentage. Avoid excessive terminal G/C clustering and inspect possible complementarity with the other primer.
Calculate Tm using relevant conditions. A salt-corrected calculator should use settings compatible with the intended buffer, primer concentration, and polymerase chemistry. Default settings aren't experimental measurements, and a precise-looking output doesn't make an incorrect input appropriate.
Confirm orientation and product boundaries. Both oligonucleotide sequences should be recorded in the 5′-to-3′ direction, with their extension ends facing into the intended amplicon. The reverse primer is the reverse complement of its target binding region, not that region copied from the displayed reference strand.
Screen structures and interactions. An oligonucleotide analyzer can evaluate each primer for hairpins and self-dimers, then evaluate the pair for heterodimers. Extendable 3′ interactions deserve particular attention because primer-associated products can compete with the intended reaction.
Retain alternatives for specificity screening. A candidate should pass the complete workflow rather than survive because replacing it would be inconvenient. Keeping alternative pairs makes redesign easier if the preferred region later proves variable or nonunique.
What the software does and doesn't establish
NCBI Primer-BLAST combines primer design with specificity checking. Primer3 supports candidate generation and thermodynamic calculations, including local workflows, while an oligo analyzer supplies a complementary view of structure and dimer risk.
These tools answer different questions. A favorable structure prediction doesn't establish genome-wide specificity, and a clean reference-genome search doesn't establish coverage of every intended strain.
The candidate record should include both primer sequences, target coordinates, predicted product, calculation settings, and any unresolved concerns. That makes the shortlist reviewable before ordering and prevents a calculator output from becoming an undocumented design assumption.
Specificity Checks With BLAST and Target Variation
Specificity is a property of the pair in its biological background, not merely a property of either sequence. Primer-BLAST can assess potential products, while BLASTn helps inspect individual binding sites and related sequences.
The alignment view should be read as evidence about binding and possible extension, not just a ranked list of similar sequences.
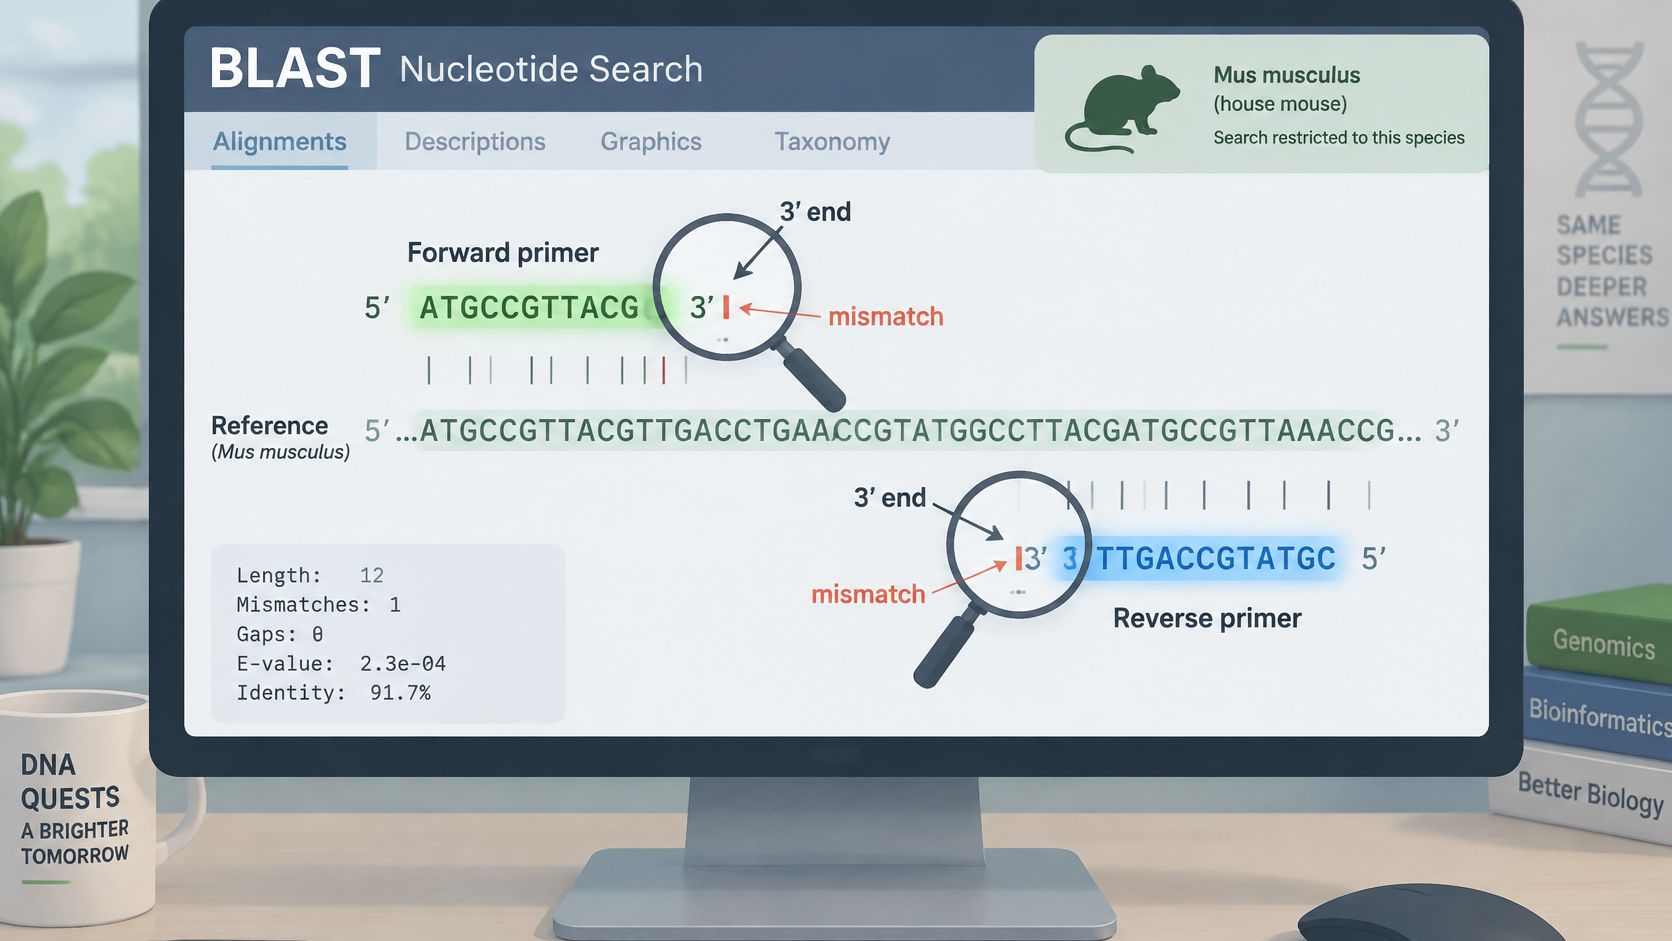
Read possible products, not just individual hits
Start with the organism of interest, then consider what else can realistically be present in the sample. Host material, related organisms, or environmental background may require additional searches rather than a narrower database restriction.
For each concerning hit, inspect:
- Binding geometry: Can both primers bind in opposing orientations and produce a plausible product?
- Extension ends: Does the off-target preserve strong matching near the primer's 3′ end?
- Related loci: Does the alignment involve a paralog, pseudogene, or repeat?
- Product identity: Could an unintended product be mistaken for the expected result?
A mismatch isn't a universal blocking mechanism. Its position, neighboring sequence, reaction chemistry, and annealing conditions all matter.
For example, suppose an off-target differs near the primer's 5′ end but matches its extension end closely. That hit remains concerning if the other primer can also generate a product. Conversely, a terminal mismatch may impair extension, but it isn't sufficient evidence to declare the off-target impossible.
Check the sequences the assay must include
The MIQE 2.0 guidance in Clinical Chemistry emphasizes coupled assay-design variables and notes that a single template mismatch can reduce melting temperature by as much as 10°C. That is a possible effect, not a correction factor to subtract for every mismatch.
Say a reverse-primer site contains a polymorphism in an intended isolate group. Even with an unchanged forward site, that assay may behave differently across groups, making a clean reference alignment inadequate.
A sequence-alignment demonstration can help make the inspection process concrete.
The scientist should define the required strains, isolates, populations, or transcript isoforms before deciding whether a variable site is acceptable. Moving a primer into a conserved region can be preferable to preserving ideal composition at a poorly conserved site.
Accept a design only when its expected inclusivity and exclusivity match the stated assay scope. Unresolved sequence coverage should remain an explicit limitation.
The written decision should name the database, relevant hits, variants checked, and the reason to accept, redesign, or move the target region. Experimental testing must then challenge both intended targets and realistic nontarget backgrounds.
Worked Example With One Primer Pair
Consider a hypothetical, unvalidated pair targeting a 120-base amplicon in a coding region. All values and screening outcomes below are illustrative, not measurements from an actual assay, and no usable primer sequences are implied.
Candidate assessment
| Check | Illustrative result | Interpretation |
|---|---|---|
| Forward primer | 20 nt, 50% GC, calculated Tm 60°C | Suitable for further screening |
| Reverse primer | 21 nt, approximately 48% GC, calculated Tm 62°C | Suitable for further screening |
| Pair matching | Calculated Tm difference 2°C | Compatible enough to test together |
| Terminal composition | Last five bases contain no run of three G or C bases | No terminal clustering flag in this example |
| Structure prediction | No concerning extendable 3′ self- or cross-complementarity predicted | Proceed, without treating prediction as proof |
| Off-target search | A paralog hit has four mismatches, all near the 5′ end | Inspect paired-product potential before acceptance |
| Target variation | A reverse-site variant has a hypothetical predicted Tm reduction of about 4°C | Restrict the assay scope or redesign |
The paralog result is the critical decision. Four mismatches don't automatically make an off-target safe, especially when the extension end remains matched. Conditional acceptance would require checking whether the partner primer can generate a plausible paralog product, followed by an appropriate experimental specificity challenge.
The reverse-site variant creates a different problem: inclusivity. If variant-bearing isolates belong inside the required scope, the candidate should be redesigned or explicitly tested for adequate detection. If those isolates are outside the intended scope, the record should state that restriction before the pair is described as suitable.
Initial bench test
For this hypothetical pair, an initial annealing setting of 55°C follows from the lower calculated Tm of 60°C. An illustrative gradient could test 53, 55, 57, and 59°C, with template and no-template controls kept comparable across conditions.
Suppose an extra band appears at 53°C, while the intended product remains at higher settings. A follow-up around 56 or 57°C would be reasonable, but only if those conditions retain adequate target yield and don't exclude the weaker-binding intended templates.
For qPCR, a clean-looking product still doesn't establish quantitative performance. Product identity, amplification behavior across a dilution series, and control results need evaluation under the intended assay conditions.
The PCR master mix calculator can support reaction-volume planning once the experimental conditions have been selected. Arithmetic checks can't determine whether the chosen concentrations or template inputs suit the assay.
The decision for this example is therefore proceed to scoped validation, not approved for unrestricted use. A promising pair becomes a defensible assay only when experimental results support the intended application.
Annealing Temperature and Symptom-Driven Troubleshooting
Annealing temperature is a variable to optimize, not a universal setting. The National Institute of Justice primer-design guidance gives a starting estimate approximately 5°C below the lower primer Tm, alongside a broader primer-length range of 18–30 bases.
A low setting may permit partially matched binding; a high setting may suppress useful amplification. Polymerase-specific guidance should take precedence when its recommended calculation method or cycling chemistry differs from a general rule.
Symptoms, likely causes and first checks
| Symptom | Likely cause | First check or fix |
|---|---|---|
| Signal in no-template control | Contamination or primer dimers | Clean the workspace, rerun the control with fresh aliquots, and inspect 3′ complementarity |
| Multiple bands | Nonspecific binding or permissive annealing | Raise annealing temperature in small steps and recheck predicted off-target products |
| Low efficiency across all samples | Amplicon secondary structure or inhibition | Test a template dilution series; assess whether a shorter amplicon would help |
| Failure in only some samples | Primer-site polymorphism or sample-specific inhibition | Compare binding-site sequences and assess matrix effects |
| No product | Annealing too high, Tm mismatch, or another reaction failure | Lower annealing temperature stepwise, recheck matched Tm values, and confirm the positive control |
These are diagnostic hypotheses, not unique explanations. The review of PCR primer design and performance describes interacting problems involving secondary structure, dimers, nonspecific binding, and restricted working conditions. A single gel pattern rarely identifies the cause by itself.
Choose a discriminating experiment
A no-template signal calls for separating contamination from primer-associated amplification. Fresh reagents and careful workspace controls address the former; product characterization and interaction screening help assess the latter. Increasing annealing temperature doesn't resolve the distinction.
For low qPCR efficiency, a template dilution series tests whether inhibition contributes to the problem. If dilution improves amplification behavior, moving the primer may not be the first useful intervention. If the problem persists across clean templates, amplicon design and reaction conditions deserve closer attention.
Sample-specific failure needs a different comparison. A failing extract and a successful extract may differ in binding-site sequence, inhibitors, input quality, or target abundance. Sequencing the site addresses only part of that list.
Troubleshooting discipline: Change one variable at a time, and record the observation that justified the change.
Primer sequence, position, and concentration should be assessed together with efficiency and sensitivity. For multiplex PCR, improving one pair can also alter competition among targets, so successful singleplex conditions don't establish panel performance.
The practical PCR workflow guide provides a complementary reaction-setup framework. Primer redesign shouldn't substitute for checking reagent preparation, template integrity, cycling conditions, and controls.
A useful optimization outcome is a working range, not merely the hottest condition that produces a visible band. The chosen conditions should preserve specificity and performance across the templates the assay claims to detect.
Record Your Primer Checks and Tools
A sequence plus a calculated Tm does not tell the next scientist which variants you treated as acceptable, or why an off-target hit was dismissed. Those calls belong in the primer record with the numeric targets: length, Tm, GC, and product size. So do the checks numbers alone cannot settle, including binding-site variation, structure flags, and the result that would make you reject the pair.
Copyable primer-design record
- Purpose and scope: Target, accession and version, intended template type, included strains or isoforms, and known exclusions.
- Sequences and coordinates: Forward and reverse sequences in synthesis orientation, binding positions, and predicted product.
- Calculation context: Tm, GC content, calculator and version, buffer assumptions, primer concentration, and polymerase.
- Specificity review: Search date, database, organism restrictions, concerning hits, and acceptance rationale.
- Variation and structure: Binding-site variants, conservation assessment, hairpin results, and self- and heterodimer findings.
- Experimental plan: Controls, annealing gradient, intended-template testing, and criteria for accepting performance.
- Outcome and deviations: Observed products, quantitative performance where applicable, changes made, and unresolved limitations.
The qPCR documentation template is a useful next step when those primer decisions move into a quantified run record.
Write the rationale down before the oligos arrive. For bench capture, Verbex for iPhone and iPad, free to download, records timestamped voice notes while your hands are on the pipette. It organizes them into a lab record with Objective, Materials, Procedure, Observations, and Conclusion. You review and seal that record, then export it as PDF or Word, or send it to your ELN. Notes stay private and on device.
Order when the design checks and testing plan are complete. I call a pair validated only after the intended-template results support that conclusion. Calculators, templates, and guides are aids, not scientific, safety, medical, or regulatory advice, and every number needs a check before you use it.
Visit Verbal Experiment or Verbex for PCR planning tools and the Lab Documentation Pack: 16 editable templates as 42 Word, Excel, and PDF files, with worked examples and working formulas. Use an editable record for the primer-selection rationale, then log the gradient results and deviations that decide whether the pair is fit for its intended use.