 Blog
Blog
Aseptic Procedures for Clean Cultures That Last
You know the moment. The hood is open, the bench is crowded, a vial is waiting, and one careless reach can turn a clean run into a culture loss you notice three days later. Aseptic procedures are not a ritual of sterile motions, they're a system for keeping contamination from entering the work in the first place, and the hard part is that the system includes material flow, airflow, hand movement, and the notes that prove what happened.
That's why good aseptic work is never just “wipe the bench and work carefully.” It's a layered setup where hand hygiene, clean barriers, sterilized tools, first-air protection, and contemporaneous records all carry part of the load. When one layer slips, the others have to catch it, and when they don't, the only useful question is whether the work can still be trusted.
Table of Contents
- What Aseptic Procedures Prevent
- Setting Up a Workspace That Stays Sterile
- Hands Garbing and Sterile Material Handling
- Performing Clean Transfers Pipetting and Culture Moves
- Common Mistakes Spills and When to Restart
- Quality Checks and Bench Records That Hold Up
What Aseptic Procedures Prevent
A bench scientist who has lost cultures learns quickly that contamination rarely announces itself at the moment it enters the workflow. It shows up later as a cloudy flask, a strange pH shift, or a result that will not reproduce, and by then the source may be impossible to pin down. Aseptic procedures exist to keep microorganisms from reaching the patient, specimen, equipment, or process before they settle in.
Antisepsis and asepsis are not the same thing
The difference matters because a disinfectant wipe can create false confidence. Antisepsis aims to destroy or inhibit microorganisms already present, while asepsis aims to keep contamination out of the work in the first place. That older distinction still shapes modern wet labs and healthcare, where hand hygiene, sterile tools, clean barriers, and written procedures work together as layers. Historical analyses of Semmelweis and Lister trace that logic from hand disinfection in maternity care to carbolic acid treatment of wounds and instruments.
The practical point is straightforward. A surface wipe does not fix crowded motion, poor airflow habits, or sloppy transfer technique. A flame does not compensate for a contaminated stopper, and a sterile glove does not help if clean and dirty paths keep crossing.
Practical rule: if contamination could have entered from the hand, the air, the vessel opening, or the tool surface, treat the whole chain as suspect until the source is clear.
Traceability is part of contamination control
Bench work needs records because memory cannot reconstruct a contamination event. If the operator, time, lot, prep steps, and deviation are not captured, contamination becomes hard to trace and hard to defend. A clean-looking result can still be untrustworthy if the handling chain is unknown.
The record also has to survive review. When a run is questioned days later, the notes, not recollection, show what touched what, when the work changed hands, and where the exposure risk may have entered. Practical aseptic work includes that paper trail, because a protocol only helps when the execution can be checked against it.
Setting Up a Workspace That Stays Sterile
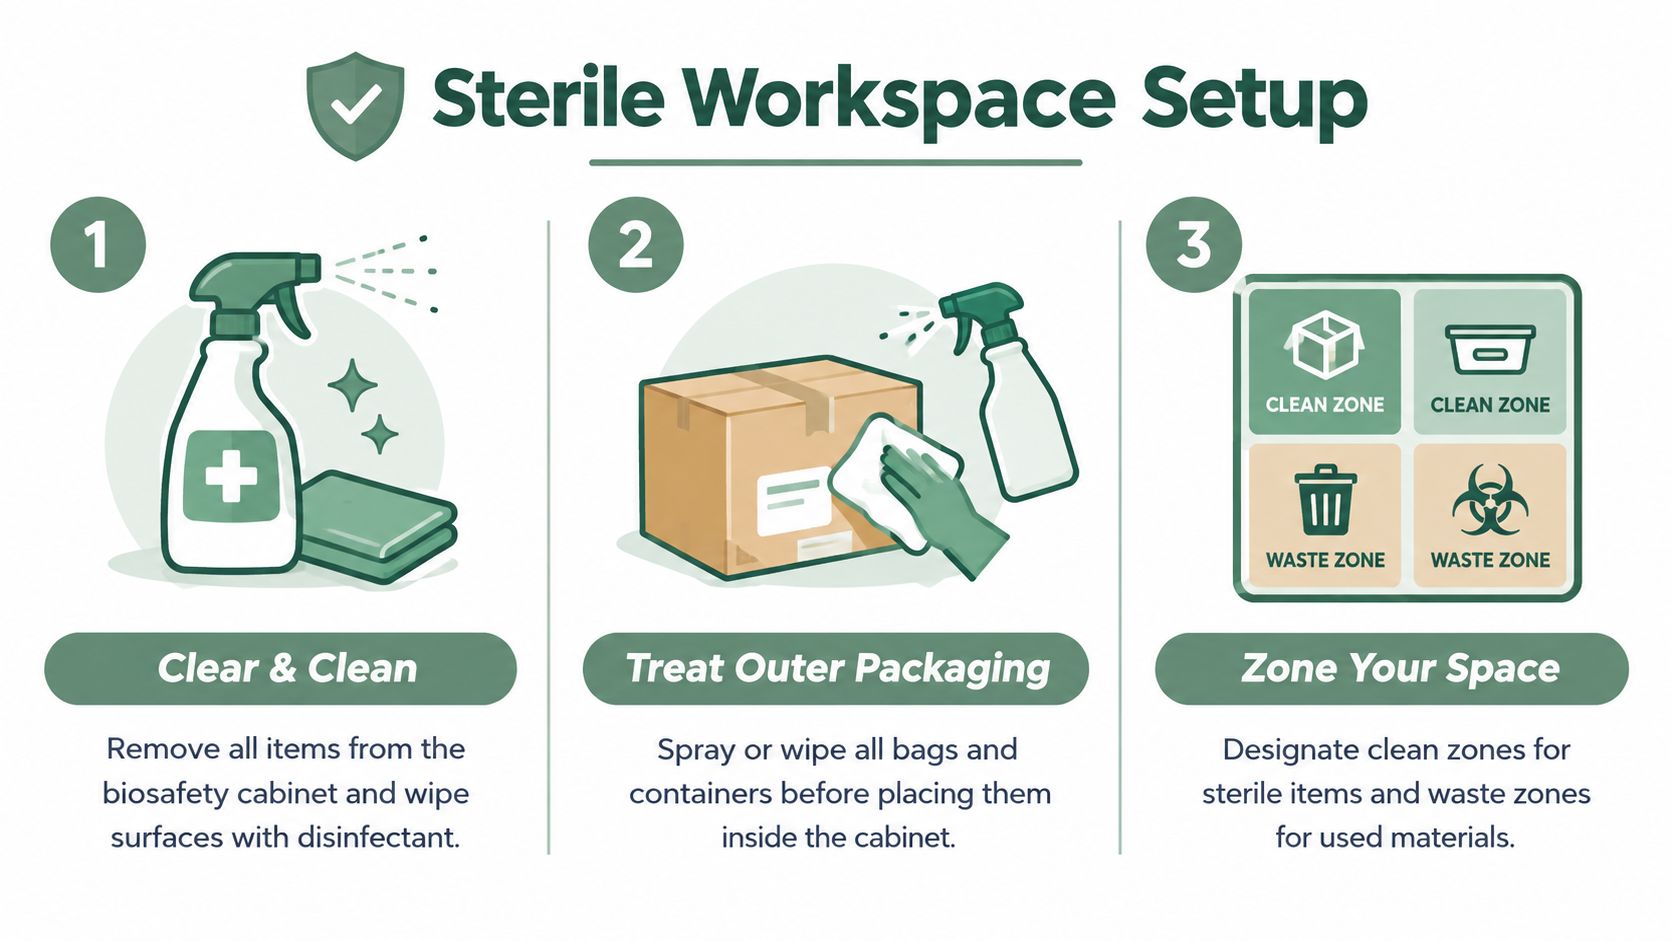
The fastest way to contaminate a clean workflow is to bring clutter into it. A cabinet full of extra tubes, outer packaging, waste, and wandering hands creates touch points and airflow problems before the first transfer even starts. The setup has to be deliberate, because material flow is part of the aseptic barrier.
Build the bench from clean to dirty
Start by clearing the biosafety cabinet or primary work area completely, then disinfect the work surface and the outside of anything that will enter it. For cell culture work, a thorough workflow begins with 70% ethanol on the cabinet surface and external material surfaces, with enough wet contact time to matter, and with supplies arranged so clean items move toward the working area without crossing waste paths. Cell culture guidance also warns against blocking the front or rear airflow grilles, which is one of the easiest ways to ruin the protective pattern inside the cabinet.
Treat outer packaging and labels as contaminated until proved otherwise. WHO guidance explicitly warns that sample packaging and labels may be highly contaminated and recommends careful handling, with outer-container disinfection done without compromising sample integrity. For laboratories that want a practical reference for documentation and deviation capture alongside this setup discipline, the Lab Documentation Pack includes protocol and SOP templates, a lab notebook entry with ALCOA+ check, deviation logs, and equipment and monitoring logs.
Here's the setup order that holds up:
- Clear the cabinet fully. Remove items you don't need, including old waste, stray tips, and anything that forces reach-around motion.
- Disinfect the workspace and incoming materials. Wipe surfaces and external packaging before they cross into the clean zone.
- Stage by flow, not by convenience. Put sterile consumables where clean hands can reach them without crossing over waste or open containers.
Keep zones obvious, not implied
A clean zone is where sterile or disinfected items live. A waste zone is where used materials go the moment they're no longer clean. The middle is where contamination usually happens, so don't let it become a parking lot.
Bench rule: if an item can't be named as clean, used, or discarded, it's probably in the wrong place.
That matters in shared rooms, too. If a hood gets used by multiple people, shared equipment, or mixed workflows, the setup has to be re-established every time instead of assumed from the last user's cleanup. For equipment selection and sterilization infrastructure, a practical vendor overview can help frame what the facility already has and what it still lacks, and find sterilization equipment vendors is one place to start that broader review.
Hands Garbing and Sterile Material Handling

Aseptic work starts before the first sterile item moves. Hands, sleeves, gloves, and forearms are part of the contamination picture, so the garment sequence and hand-cleaning sequence have to support the flow of material, the direction of movement, and the notes you make while the work is still fresh. In sterile compounding settings, aseptic mechanics cover hand hygiene, garbing, disinfection of supplies and critical sites, work inside an ISO Class 5 primary engineering control, and protection of first air. USP <797>-type guidance ties those steps into one workflow.
Start with hands, not gloves
Gloves do not make dirty hands clean. A cited implementation calls for washing hands and forearms to the elbows with soap and water for at least 30 seconds, cleaning beneath the fingernails, applying alcohol-based hand rub, and letting the hands dry before sterile gloves are donned. The USP <797> workflow also specifies sterile 70% isopropyl alcohol for items entering the controlled area and for critical sites such as vial stoppers, ampule necks, and IV-bag septums.
That logic holds at the bench too. Once a gloved hand touches a nonsterile surface, the glove carries that risk until it is disinfected or replaced. In the cited sterile-compounding workflow, gloves and horizontal work surfaces are disinfected at least every 30 minutes, and again whenever gloved hands leave and re-enter the controlled area. The interval matters less than the habit behind it. Glove surfaces pick up contamination quickly, and the work only stays controlled if you keep resetting them.
Protect the critical sites
Critical sites are the points that cannot be left open to chance. Vial stoppers, ampule necks, transfer tips, syringe hubs, and open culture vessels all deserve the same handling because they are entry points. Keep them in unobstructed HEPA-filtered first air when the setup provides it, and do not hover hands, sleeves, or containers over that opening any longer than needed.
Speed causes most of the trouble. People start talking, reaching, and turning at the same time, and the field turns into a moving wall in front of the sterile zone. That is when contamination slips in, especially when the bench is crowded or the operator has to fumble for a cap.
“The sterile field is only sterile while the motion is disciplined.”
Performing Clean Transfers Pipetting and Culture Moves
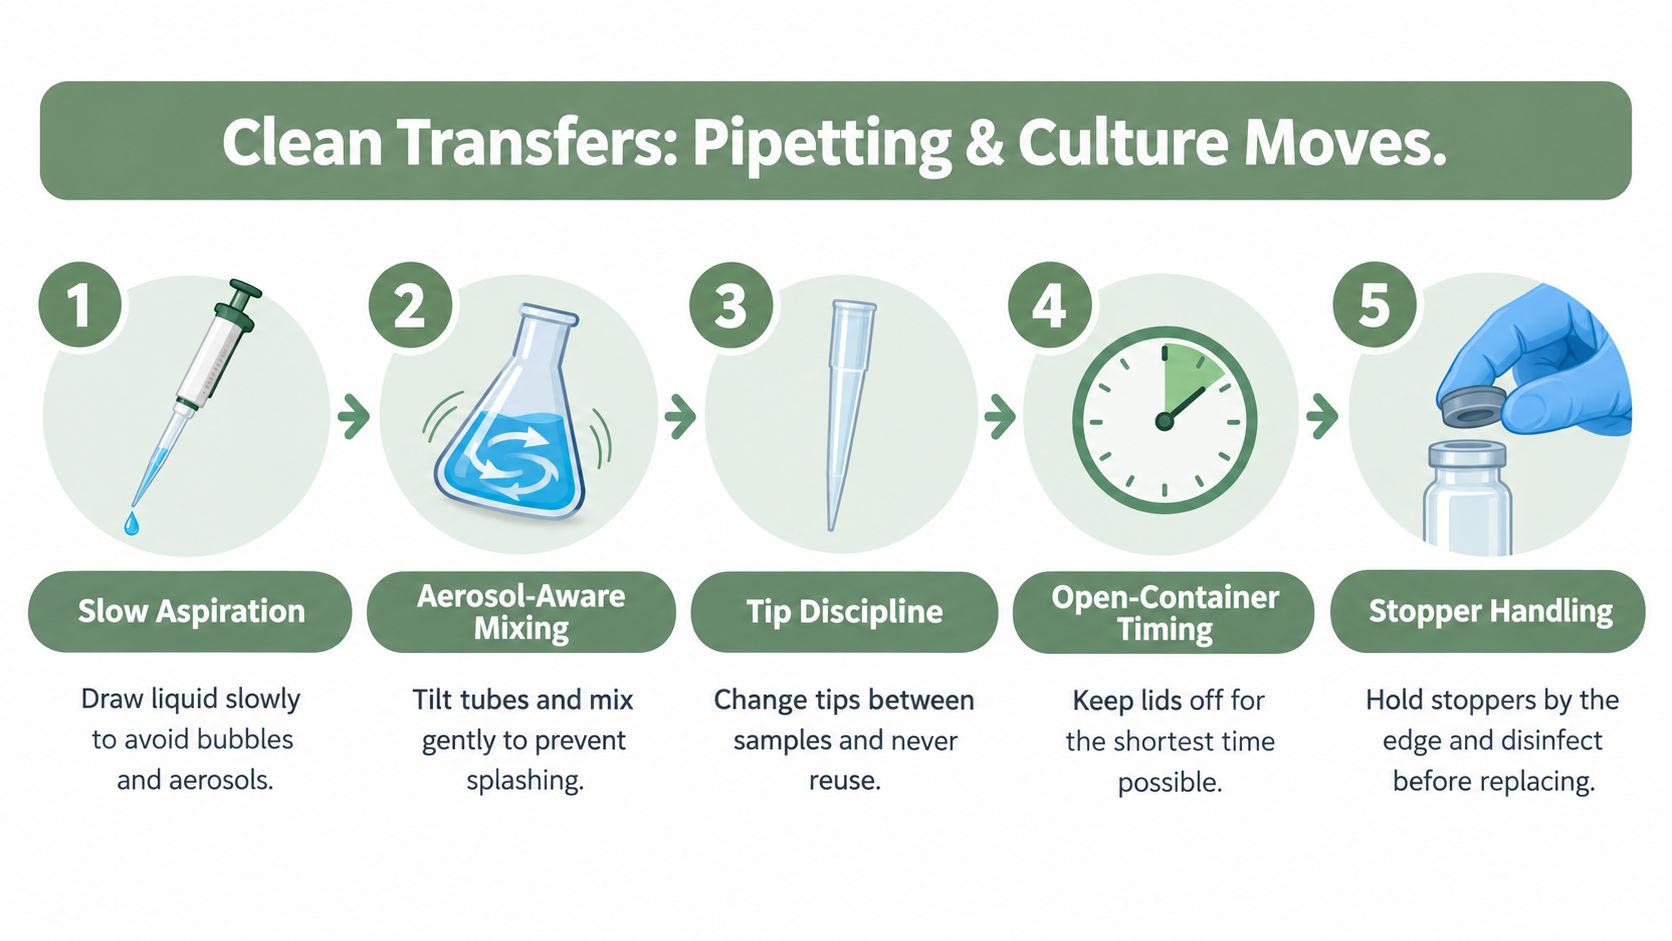
A clean transfer looks almost boring when it's done well. The pipette moves slowly, the lid is open briefly, the tube is angled without splashing, and nothing touches what it shouldn't touch. WHO's laboratory biosafety guidance identifies pipetting errors, aerosolization, splashing, forceful expulsion, and inappropriate use of needles or syringes as hazards, and it recommends training personnel in correct pipette use to reduce contamination from aerosols and splashes. That guidance fits the practical conditions of culture work better than vague "work carefully" advice.
Motion is part of sterility
Aspiration should be slow enough to avoid bubbles and surprise surges. Mixing should stay gentle, because aggressive motion makes droplets and aerosols more likely. Containers should stay open only as long as needed, and the tip should move with intent, not with the kind of sweeping gesture that crosses the field like a broom.
Crowded hoods are a problem because they force bad geometry. A hand that has to reach over open containers creates shadowing, and shadowing is exactly where first air gets blocked. If the space feels awkward, it usually is.
Small interruptions deserve immediate notes
Dropped tips, glove touches, and unexpected splashes aren't minor if they change the contamination risk. The correct response is not to shrug and continue as if nothing happened. It's to decide whether the work can safely continue, whether the material should be replaced, or whether the run should be restarted.
Useful habit: write the deviation the moment it happens, while the context is still exact.
For bench scientists who need a quick reminder of transfer timing and culture-handling values, useful numbers for cell culture pairs well with this kind of motion discipline, because the practical problem is usually not knowing that work should be sterile, but remembering the small timing details under pressure.
Common Mistakes Spills and When to Restart
The most common failure in aseptic work is not a dramatic accident. It's rushing through a routine step because the operator thinks the bench already looks clean. That's why contamination control has to be measured, not assumed, and why competency checks matter.
What usually goes wrong
Rushing makes people skip the small actions that keep contamination out. Skipping disinfection leaves a bridge from a dirty surface to a clean one. Overcrowding blocks airflow and forces hands to move around too many obstacles. Those are not abstract errors, they're the ordinary ways a supposedly sterile setup stops behaving sterile.
WHO's biosafety guidance also recommends training personnel in correct pipette use to reduce contamination from aerosols and splashes, which is a reminder that even good-looking technique can fail if the motion itself is wrong. The problem is often invisible until a contaminated unit grows out later.
Spills and suspected exposures need a hard decision
If a spill occurs, cover it immediately with disinfectant-soaked material and assess what was exposed. If skin, gloves, or critical materials were contaminated, stop and treat the work as compromised until it can be cleaned and documented properly. If there's any real uncertainty about whether the sample is still trustworthy, discard it and begin again rather than trying to rescue a doubtful run.
That restart decision is not defeat. It's a safeguard against spending more time on work that already lost its sterility. The smarter choice is to preserve confidence in the result, not to protect the appearance of progress.
Competency should be proven, not inferred
A 2008 study of 84 students showed that aseptic performance can be measured with media-fill testing instead of assumed from course completion. At the beginning of the parenterals laboratory course, 21 of 504 syringes were contaminated, equal to 4.17%, and 18 of 84 students produced at least one contaminated syringe; near the end of the course, contamination fell to zero among 498 syringes, and none of 83 evaluated students produced a contaminated syringe, with both changes statistically significant at p < 0.001. The study used trypticase-soy broth so microbial growth would reveal contamination during vial, ampule, syringe, and reconstitution steps.
For troubleshooting, that matters more than people think. A trained operator can still create contamination if the workflow is sloppy, and a positive unit should trigger investigation rather than denial. For a related way to think about why unexpected outcomes deserve structured review, unexpected results is a useful framing resource.
Quality Checks and Bench Records That Hold Up
A clean run means little if nobody can reconstruct how it happened. In aseptic work, the record is part of the control system, because material flow, operator motion, and contemporaneous notes all shape the risk of contamination.
What to write at the time
Write down the operator, time, material identity, lot information, preparation steps, observations, and any deviation while the work is still in front of you. That kind of note is plain, but it is what separates a usable bench record from a memory exercise written after the fact. If a run has to be reviewed later, those details show where the workflow bent and what changed.
The strongest notes stay concrete. They describe what was touched, what looked off, and what action followed. If a tube cap was left open too long, if a glove touched the bench edge, or if a transfer paused longer than expected, the record should say so in plain language.
Monitoring makes the record stronger
Environmental monitoring belongs in the same system as the bench notes. WHO guidance points to air samplers, settle plates, contact plates, or swabs, which is a practical reminder for shared labs where visual cleanliness can hide real exposure.
Structured measurement matters in other regulated fields too, as this guide to quantitative research for waste operations shows. The point is the same: capture the condition, tie it to the method, and keep enough context to interpret the result later.
For labs that need a tighter documentation structure, quality control documentation is a practical companion topic, especially where deviations, checks, and records have to line up. A simple review pattern works well:
- Capture the source note immediately: record the exact observation while the context is still fresh.
- Mark the deviation clearly: identify the step, material, or motion that changed.
- Keep the evidence attached: include images, timers, or label photos when they help explain the event.
One tool can help without replacing judgment
Verbex: Voice Lab Notebook is a private, on-device lab notebook for iPhone and iPad that captures voice notes, typed notes, timers, and photos at the bench, then organizes them into a structured record for review and export to PDF, Word, or Markdown. It helps preserve the context of a deviation or observation while the hands are still busy, and it keeps the record tied to the moment it was made.
If contamination keeps showing up in the same place, the answer is usually in the flow of the work, the timing of the transfer, or the missing note that should have been written then and there. Set up a tighter record, capture deviations at the bench, and make the next run easier to audit than the last one.