 Blog
What Is Master Mix in PCR: A Plain Guide to Components
A PCR master mix is a premixed solution of the components every tube in a batch shares, usually DNA polymerase, reaction buffer, magnesium chloride and deoxynucleoside triphosphates (dNTPs). Primers and template DNA are added separately because they change from assay to assay and from sample to sample, and most commercial mixes arrive at twice the working strength, so half the final volume is mix and the other half is the parts that make this run different from the last one.
Eight tubes sit in a rack. The protocol lists the same four shared reagents eight times, and pipetting each one separately means 32 chances to skip a tube, short a tip or add the wrong volume to well seven. That arithmetic is the whole reason a master mix exists.
Answering what is master mix in PCR properly means saying what it doesn't do, too. It won't rescue a primer pair that anneals badly or a template that has sat in a freezer for three years. It removes shared pipetting, not experimental risk.
By the end you'll know what's inside the tube, how to build a 25 µL reaction from a 2X mix, why magnesium is the dial many labs turn first, and how to check a new lot before it touches a plate of 96 samples. One question to hold onto: does every well in this run need the same reagents? If the answer is yes, the mix belongs in front of you before the primers do.
Table of Contents
- What a PCR Master Mix Is and Why It Exists
- The Components Inside a Master Mix
- How to Set Up a Reaction With Master Mix
- Why Magnesium and dNTP Balance Matters
- Checking a New Master Mix Lot Before a Large Study
- Common Misconceptions and the Run Record
What a PCR Master Mix Is and Why It Exists
A fresh tube comes out of the freezer with a product name and lot number identifying the reagent batch used across the wells. In PCR, a master mix is that shared batch: a premixed solution containing the components common to the reactions, typically DNA polymerase, reaction buffer, magnesium chloride and dNTPs. Primers and template DNA stay outside the mix because they change with the assay and with each sample.
Making that shared portion once serves three purposes. It reduces repetitive pipetting, gives every well the same chemical environment and narrows the source of a failure. If a shared reagent is left out while reactions are built one by one, a single failed reaction can look like a bad sample. With a mix, a missing or defective shared component is more likely to affect the run as a whole, where controls can expose it.
That makes the tube a reagent lot to verify and record before every run. Confirm that the label names the intended product, copy the lot identifier into the run record and include controls capable of showing whether the shared chemistry worked. If the controls fail together, examine the mix and how it was handled. If only one sample fails, begin with that sample and its assay-specific reagents.
The mix's job is consistency. It cannot make mismatched primers anneal correctly or restore degraded template DNA. Identical starting chemistry reduces preparation variation, while primer design and sample quality still determine whether the target can amplify. For the wider setup and cycling sequence around this step, follow this guide to performing PCR step by step.
The Components Inside a Master Mix
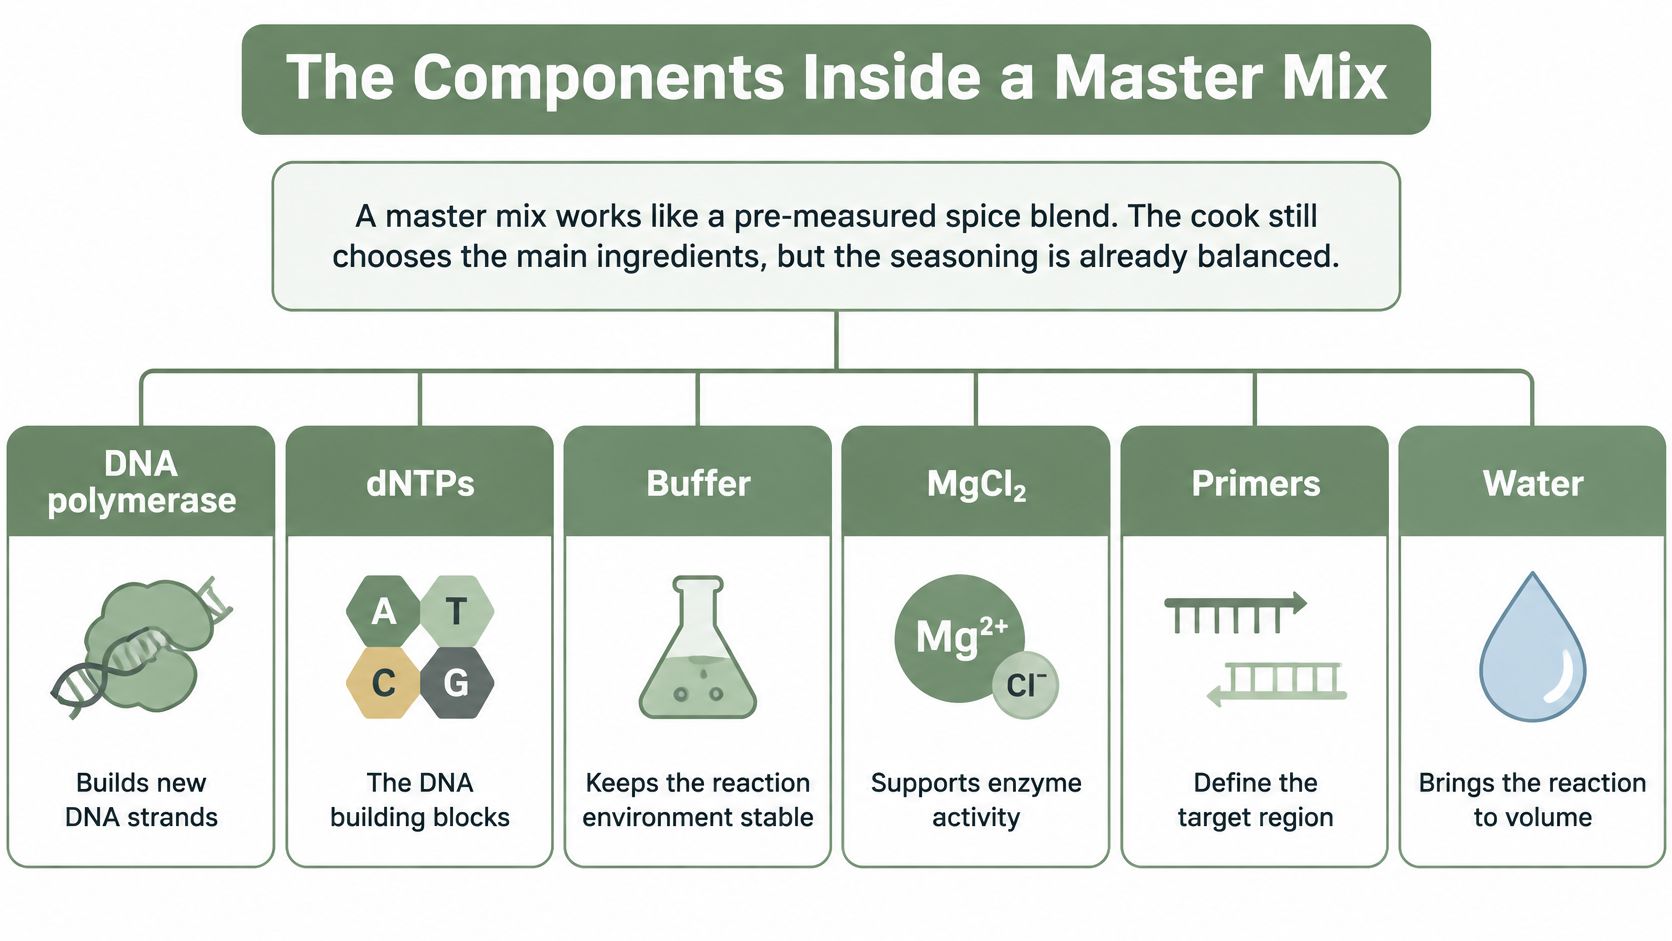
Before a new reagent lot goes into a run, check its label and product sheet. Confirm which reagents the mix supplies, which need to be added separately, and the concentrations after dilution. A master mix is a shared base for reactions, not a finished PCR reaction.
The Promega PCR Master Mix product information sheet lists polymerase, dNTPs, MgCl₂, and buffer in its mix. The user adds template DNA and primers separately. Its supplied mix contains 400 µM of each dNTP and 3 mM MgCl₂. Those are concentrations in the mix itself; the final reaction concentrations depend on how much mix is added and the total reaction volume.
What the mix carries and what it leaves out
| Component | What It Does | Typical Level in Final Reaction |
|---|---|---|
| DNA polymerase (often Taq) | Builds new DNA strands from nucleotides | About 0.025 U/µL in one validated 1X formulation |
| Reaction buffer | Holds pH and ionic conditions steady | Supplier-defined; check the product sheet |
| Magnesium chloride (MgCl₂) | Acts as a polymerase cofactor and affects primer binding | Roughly 1 to 2 mM, depending on the formulation |
| dNTPs (dATP, dGTP, dCTP, dTTP) | Supply the nucleotide building blocks for new DNA strands | About 200 µM of each in a typical formulation |
| Hot-start chemistry and stabilizers | Keep polymerase inactive during setup and help protect the formulation | Product-specific; check the product sheet |
| Primers and template DNA (not included) | Specify the target and provide the DNA sample | Added separately for each reaction |
| Nuclease-free water (usually added) | Brings the reaction to its final volume | Added as needed to reach the planned volume |
The table gives typical final-reaction levels, not universal specifications. For example, Merck describes a validated formulation with 0.05 U/µL Taq polymerase and 4 mM magnesium chloride in the 2X mix. Diluting it to 1X gives about 0.025 U/µL polymerase and 2 mM magnesium chloride (Merck's PCR master mix technical note).
Some mixes also contain hot-start chemistry, which holds the polymerase inactive during setup, and stabilizers that help protect the formulation. These ingredients vary by product. Check the product sheet for what a particular lot contains rather than relying on the product name alone.
Primers are supplied separately because their sequences define the target. Poorly designed primers can still produce nonspecific amplification or primer-dimers, which a master mix cannot correct. Review the principles of designing primers for PCR when choosing a primer pair.
For a new lot, record the product and lot identifiers, then compare the listed components and concentrations with the sheet you use for the run. Two products labeled “PCR master mix” can have different magnesium levels or hot-start chemistry.
That check also helps separate a reagent issue from a primer or template problem when a run behaves unexpectedly. A master mix supplies the shared reagents; it cannot establish that the inputs are suitable for a particular assay.
How to Set Up a Reaction With Master Mix
A 2X master mix behaves like frozen juice concentrate. Add an equal volume of everything else and the reaction reaches the strength it needs, which is why nobody pipettes concentrate straight into a tube and calls it done.
The Thermo Fisher 2X PCR Master Mix user guide lays out a 25 µL reaction with 12.5 µL of 2X master mix, 1.25 µL each of 10 µM forward and reverse primers, 0.5 to 10 µL of template DNA, and nuclease-free water to volume. Each primer finishes at 0.5 µM, and the guide's recommended template load is 0.5 to 125 ng.
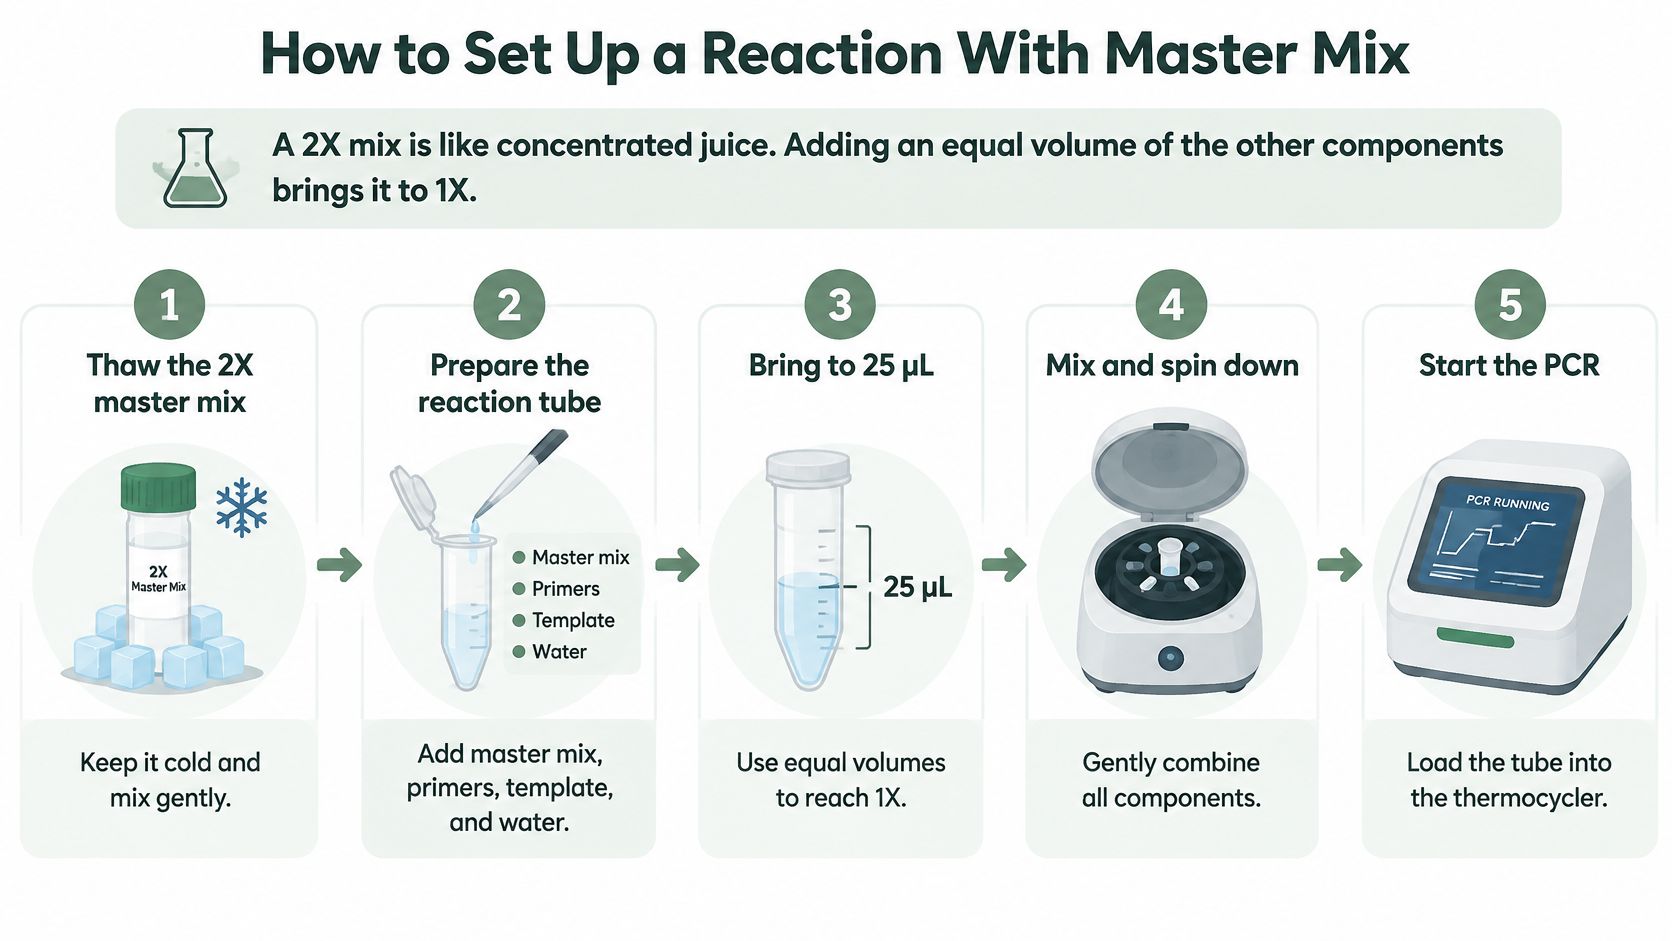
- Thaw the 2X mix on ice. Wait until no ice crystals remain, mix by gentle inversion or slow pipetting, and spin briefly so the liquid collects at the bottom. Vortexing foams the mix and leaves enzyme on the tube wall.
- Do the arithmetic once, for the whole batch. Multiply each volume by the reaction count, add about 10% for pipetting loss, and let a PCR master mix calculator handle the water and the excess. It checks its own arithmetic, not whether the stock concentrations you typed match the tubes in front of you.
- Dispense water before mix. Water first, then the 2X mix, makes it obvious at a glance whether any well was skipped.
- Add the primers. 1.25 µL of each 10 µM stock per tube brings each primer to 0.5 µM final.
- Add template last. Work from the lowest DNA concentration to the highest so a stray droplet can't carry into the next tube. With 1 µL of template the water comes to 9 µL; at 10 µL of template there is no water at all.
- Seal, spin and include a no-template control. The control is water in place of template, and it is the only well that tells you the mix itself was clean.
| Component | Volume in 25 µL | Final Concentration |
|---|---|---|
| 2X master mix | 12.5 µL | 1X |
| Forward primer (10 µM stock) | 1.25 µL | 0.5 µM |
| Reverse primer (10 µM stock) | 1.25 µL | 0.5 µM |
| Template DNA | 0.5 to 10 µL | 0.5 to 125 ng total |
| Nuclease-free water | Fills to 25 µL | Not applicable |
The order matters less than the habit. Template last keeps the shared mix free of sample DNA for as long as possible, and the no-template control converts a mystery into a diagnosis: if it amplifies, the problem sits in the mix, the primers or the workspace rather than in the sample.
For the cycling side of the same setup, this walkthrough covers what happens once the tube goes into the block.
Every supplier sets its own final volume and cycling conditions, and those instructions win whenever they differ from the example above.
Why Magnesium and dNTP Balance Matters
Magnesium is the salt in a sauce. Too little and the reaction tastes flat, too much and it stops tasting like what you intended.
Both magnesium and dNTP levels shape yield and specificity, which is exactly why a mix fixes them in advance rather than leaving them to the pipette. A New England Biolabs Taq polymerase protocol puts the optimum at 1.5 to 2.0 mM Mg²⁺ for most products generated with Taq and recommends changing magnesium in 0.5 or 1.0 mM increments during optimization. The same protocol gives 200 µM as the typical final concentration for each dNTP, while standard PCR references note the reaction tolerates roughly 20 to 200 µM of each nucleotide.
The trade-off in two directions
Run short of magnesium and the polymerase underperforms. Yield falls, bands come up faint, and a qPCR curve shifts late enough that a sample looks low-expressing when it isn't. Push the concentration too high and the enzyme begins extending primers that aren't a perfect match, which appears as extra bands, a smear, or a melt curve with more peaks than the assay has products. Excess or insufficient magnesium and dNTPs can change both yield and specificity, which is why a premixed formulation exists in the first place.
Four checks before anyone touches the magnesium:
- Read the stated level. The data sheet gives the final concentration, not just the stock.
- Confirm what's already in the mix. Most mixes include magnesium, so adding a separate MgCl₂ solution double-counts it.
- Change one variable at a time. Move magnesium in small steps and keep primers, template and annealing temperature fixed, or you won't know what worked.
- Re-run the same dilution series. A new magnesium level judged on a single input amount proves very little.
A premixed formulation removes the tube-to-tube variability of hand-pipetting magnesium and nucleotides. It doesn't make a difficult assay easy.
Primers, annealing temperature and template quality still decide whether a fussy target amplifies.
Checking a New Master Mix Lot Before a Large Study
A new master mix lot can shift a familiar assay even when the primers, template, and cycling program stay the same. Treat the lot number as a reagent change to verify before it enters a large study.
Merck recommends verifying an assay after changing master mix and comparing a new lot with the current lot before starting large studies (Merck PCR troubleshooting guide). A planned comparison can prevent days of troubleshooting later.
Set up the check before reviewing results:
- Choose a template dilution series that spans the working range. Include a low-input point, where a sensitivity change may be easiest to detect.
- Run both lots on the same plate. Keep primers, dilutions, cycling program, and operator consistent where possible.
- Include a no-template control and a positive control for each lot. This helps distinguish a lot-specific problem from a plate-wide failure.
- Compare more than the threshold cycle. Review efficiency across the dilution series, product specificity on a melt curve or gel, replicate spread, and any signal in the no-template control.
- Record the result with both lot numbers. “New mix” alone is not enough to identify the reagent later.
Set acceptance limits before looking at the data. Decide in advance what shifts in efficiency, replicate spread, or signal you will accept, and how to pick a research approach can help frame that decision. Keep using the current lot until the new one meets those limits.
Crude samples need a separate check because inhibitor tolerance can differ among formulations. One evaluation identified KAPA Blood Direct with added Platinum Taq as the strongest performer among the reagents tested on inhibitor-containing samples (Applied and Environmental Microbiology). Promega reports that its Endure qPCR mix tolerated more than 500 µM hematin, 9% ethanol, 4.5 mM EDTA, and 6,000 ng per reaction of humic acid with less than a 2-Cq shift on a 75-bp target. Those figures apply to that product and test setup; they do not establish performance with a longer amplicon, a multiplex panel, or a different sample matrix.
Common Misconceptions and the Run Record
Three assumptions cause most of the damage.
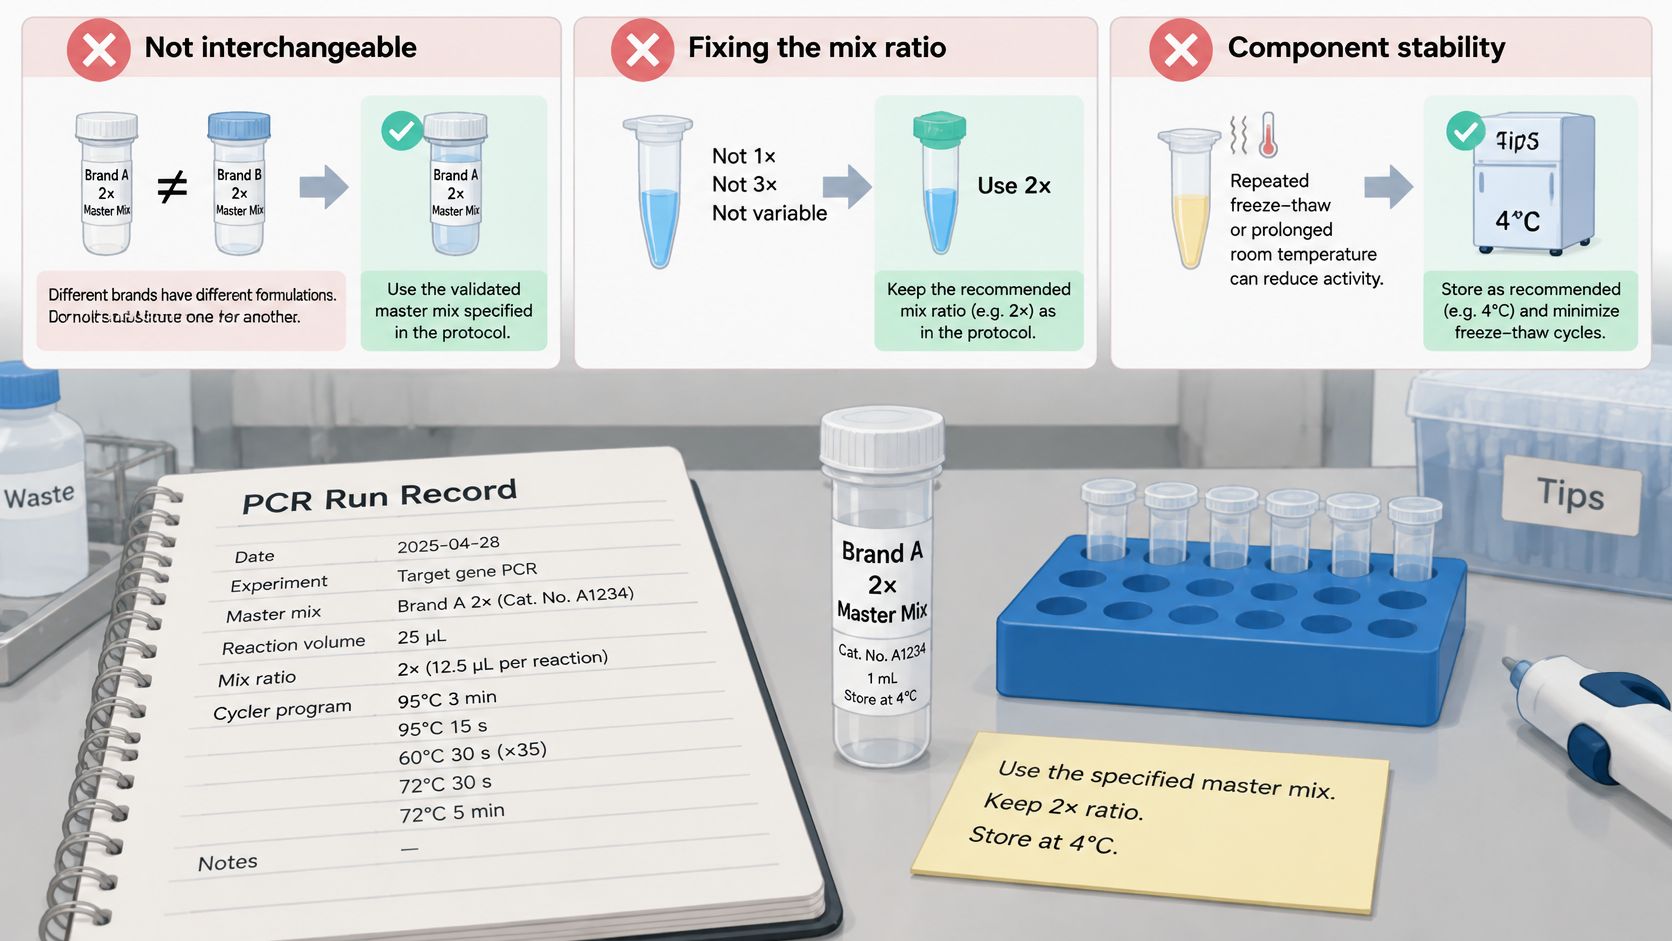
Every 2X mix is interchangeable. Two products can share a label, a concentration and a shelf life while differing in buffer composition, magnesium balance and enzyme chemistry. Swapping brands mid-study, or accepting a new lot without a comparison, shifts performance in ways the protocol never mentions. The side-by-side lot check is the only honest test.
The mix fixes a failing reaction. It won't. A mix cannot design a better primer, clean up a template carrying phenol or salt, or pick an annealing temperature for a target with unusual GC content. When every sample and the positive control fail together, suspect the reagent. When only some samples fail, suspect the template.
Naming the product in the notebook is enough. It isn't, because "PCR master mix" doesn't identify a reagent. The record needs the product name and supplier, catalog number, lot number, stated concentration such as 2X, receipt or preparation date, freeze-thaw count, storage temperature, aliquot ID, instrument and block, cycling program, and operator. Those fields are what let a team trace a bad run back to a reagent in minutes instead of re-running the whole experiment.
A mix failure takes out every sample and the positive control at once, so the plate looks like a biological negative rather than a reagent problem.
Verbex, made by Multimod Labs, is a private lab documentation app for iPhone and iPad built for exactly this kind of capture. Thaw steps, lot numbers and the observation that the mix looked cloudy get recorded by voice, typing, timers and images with timestamps, then reviewed and exported as PDF, DOCX or Markdown into an existing ELN workflow. It supports clearer contemporaneous documentation; it doesn't replace an official ELN or validated system, and it doesn't decide whether a result is valid. Verbex for iPhone and iPad, free to download.
The protocol says what should happen. Verbex records what happened, which is the gap that costs a week when a new lot behaves oddly on a plate of 96. Capture the lot number, the thaw time and the one thing that looked different at the bench, then carry the record into whatever ELN your lab already runs. Visit Verbex to see how a source-backed bench record comes together before the next run.